File storage in Moodle 2
| Site: | MN Partnership for Collaborative Curriculum |
| Course: | Teaching with Moodle 2: Training, collaboration and reflection online |
| Book: | File storage in Moodle 2 |
| Printed by: | Guest user |
| Date: | Monday, December 22, 2025, 4:46 PM |
Description
An overview of the changes to adding files into Moodle 2 and some how to instructions and tips!
1. Changes!
The way that files are stored in Moodle 2 is very different to Moodle 1.
It may seem a bit confusing at first but there are lots of benefits.
This book will go through the changes, the benefits, the extras and some tips to make it easier to use!
2. What's different?
In Moodle 1, files are added into individual courses on Moodle from personal computers, removable storage (eg: Memory sticks) or network drives (My Documents or Staff Shared Drive).
The image below shows how this works:
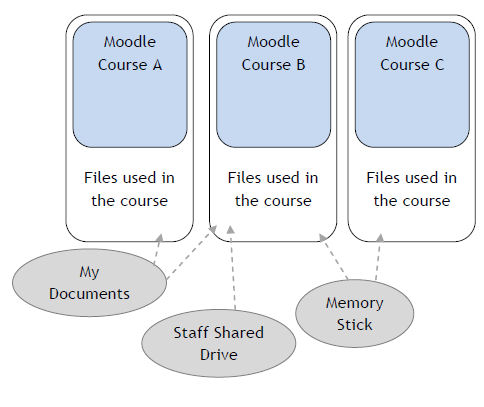
If you want resources in course A and course B you need to add them separately into each course.
In Moodle 2, files are stored in one big files area.
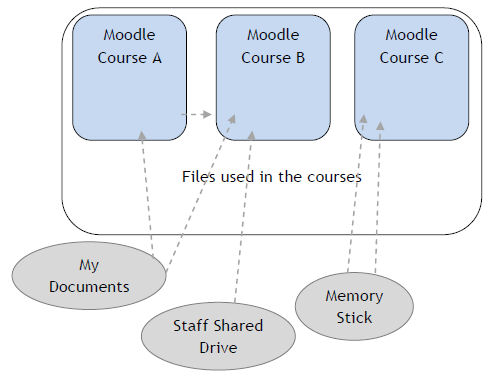
You can still upload via the course in the same way (as shown in the image above).
However, they are stored centrally in the background which means you can share files across courses rather than add the information into each course separately.
3. A video to explain it through drawings!
This video is going to attempt to show how it works (simply)
Moodle_2_file_storage_explained.wmv
The video on the page is probably too small so click on the link above it to watch it in a separate window.
4. A little bit technical...
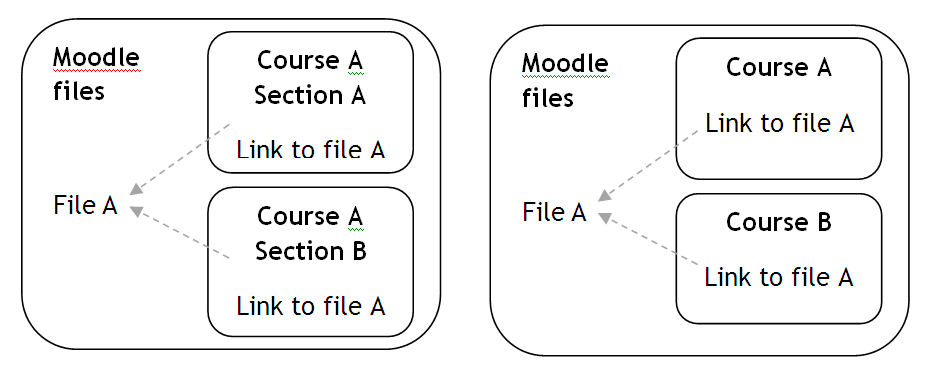
When you add a file into Moodle, it is stored centrally.
If you upload file A to go into section A, you would do it in a very similar way to Moodle 1.
If you want to add file A into section B, you could go through exactly the same process again and upload it again. This means you are doing something you are familiar with Moodle. However, even if you manually upload the files twice, it is not stored twice. Moodle only keeps one of the files so that less space is used in Moodle. In the background, Moodle knows that this is the same file as used in section A so it will only keep one of them.
It works the same if you want to share file A in lots of courses. You can either upload it again OR you can go and find the file in Moodle to reuse it. You can only access resources from other courses in which you have editing rights.
It is not that easy to navigate to other courses in Moodle so the recent files option is usually the best. More on this later!
5. So - where are the files?
The files in Moodle are in an area called server files. This contains all the files in Moodle.
When you go to the server files from your course, you will see the files for YOUR course.
You can see where you are with the menu at the top of the box.
Take a look at the image below. This is the course called Course for testing new features and all the resources for that course are shown in the main window.
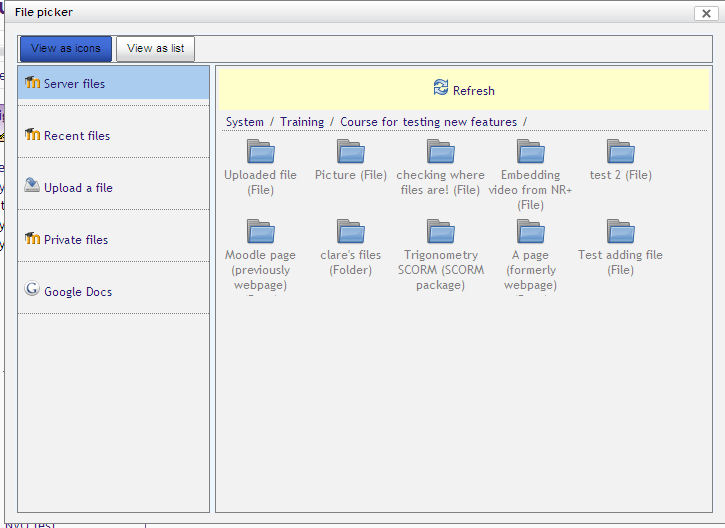
The two bits before it show where it is in Moodle.
System is the whole of Moodle
Training is a category
Course for testing new features is a course.
The diagram below shows this in a picture.
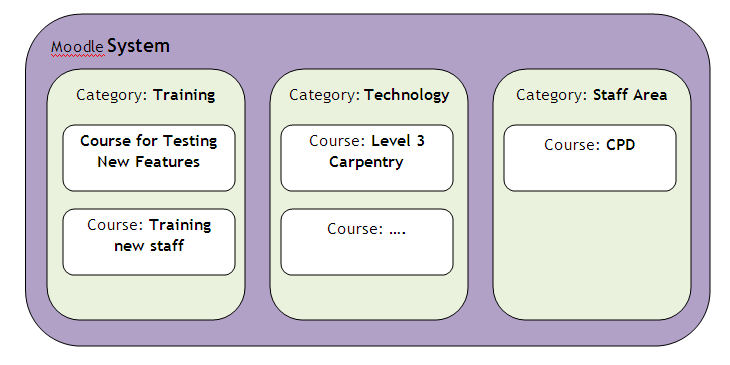
In the file picker image from Moodle, you are looking at the course for testing new features and the files that are used in it.
When you add a file, Moodle organises it into it's own folders which can be a bit confusing. However, it should always be based on the name you gave the resource when you were adding it to Moodle.
When you are shown how to add resources, you will be given some tips on how best to manage your files and add them into Moodle.
6. What are the extras?
There are lots of other places you can add resources from in Moodle 2.
The options you get will depend on what you are adding. For example;
- If adding an image, you might also have access to Flickr and add the image into the page.
- When adding multimedia, you can choose to search for a video in YouTube and then add it to your course with a click!
The left hand column on the image below shows the main options when adding a file:

The main one you will probably use at first is Upload a file. This lets you choose your My Documents, memory stick or any other place you have access to on your computer. This will be same as adding a file in Moodle 1.
We have already looked at Server files which is all the files currently in your course. You can click on the folders and then choose the file you want. If you want to find a resource from another course, you need to know what category it is in and then find the course and click on the file you want. You can only access the resources of courses where you have teacher access.
Recent files are ones that you have recently uploaded into Moodle into any course. If you are working in lots of courses at the same time and some of the files are shared, the quickest way to find them will be to look in recent files. This is much quicker and easier than using server files.
Private files is an area that you can store files only you can access. You can add resources INTO your private files through the My Home link in the navigation block. If there is a file in your private files area you want to make available on the course, you can get to them by clicking private files. This is particularly useful for students who can upload their working documents for assignments into private files and then, when they are ready to submit them, they can choose it from private files.
You can also add other options for accessing resources - such as googledocs or file repositories.
7. Common questions and concerns!!
What happens if two people upload files with the same name?
As Moodle only keeps one copy of each file many people are concerned that their file will be overwritten with someone elses content. This is not the case. Moodle is very clever! When two files are uploaded Moodle checks the entire content of the file as well as the file name. If the files are identical it will only keep one of the files. If they are not different (even if the only difference is full stop) they will be seen as different files and each will be stored within Moodle.
If I upload a file from my computer and then change it on the computer - will it change the uploaded version on Moodle too?
No. When you upload something, it is stored completely seperately. If you change the file on the computer and you want that version on Moodle, you need to upload it again. However, in contrast to Moodle 1, when you re-upload a file in Moodle the file name does not have to be changed to force it to update. See the 'some tips' page for instructions on how to do this.
However, for future versions of Moodle they are working on developing repositories to allow you to link to files within a repository and if you put the file into a course from the respository and then change the file within the repository it will change the file within the course. It would essentially link to a central file. There is also talk that that we could add files into our private files area and then add these into 3 Moodle courses. If the file is updated within the private files it will also update the file in the 3 courses too. Something to look out for!!
8. Now I know the theory - how do I do it!!
Uploading a file into your Moodle course
- Turn editing on and click on 'add a resource'.
- Choose file.
- In the name box type in the name of the resource (this will become the link that the student clicks on).
- In the description box add a brief summary of what the resource is.
- Click on add
- This will take you to the file picker area
- Click on upload a file and then click on browse
- Find the file on your computer / removable storage and click on open (the same as Moodle 1 or adding an attachment to an email).
- In the save as box you can give the file a new name for it in Moodle. It is recommended that the file name is unique and not too long.
- Click on upload this file.
- Scroll down and click on save and display. No need to 'choose' anymore!!
Choosing a file from another course to put into your Moodle course (only courses you have teacher access to):
- Turn editing on and click on 'add a resource'.
- Choose file.
- In the name box type in the name of the resource (this will become the link that the student clicks on).
- In the description box add a brief summary of what the resource is.
- Click on add
- This will take you to the file picker area
- Click on server files and then click on system. Choose the category the course is in.
- Each course will have it's own folder which will be the name of the course. Click on the course you want.
- All the files in the course will be shown. You should be able to find the file based on the name of the resource on the original course. Go into the folder with the correct name and click on the resource you want in your course (you can only choose files, not folders).
- Scroll down and click on save and display.
9. Some tips!
- It is recommended that when you add information to Moodle, you add the file each time until you get used to how the files are stored.
- Important: When you use the same file in multiple courses, it copies the file into your new course. If you change the file and reupload it in the original course it will not be updated in the other courses. However, you can easily go in and add it to the other courses again without needing to upload it again. The best way to do this is to use the recent files option in the file picker.
Updating files / re-uploading files
- Turn editing on on your course
- Click on the edit icon next to the resource you want to update
- When you are in the editing screen, scroll down to the content area and you will see a link to the file you are currently using. Next to the file name there is a small box. Click on this and click on 'delete' (and say yes to confirm).
- Click on 'add' and upload the file again.
- Save and return to course and the new file will now be available.
- If you have the same file in other courses, repeat steps 1 to 3 but in step 4, instead of using the upload a file option in the file picker, click on recent files to choose the file.