WATCH: Pixlr Tools
| Site: | MN Partnership for Collaborative Curriculum |
| Course: | Digital Photography |
| Book: | WATCH: Pixlr Tools |
| Printed by: | Guest user |
| Date: | Monday, January 26, 2026, 4:51 PM |
Description
WATCH: Pixlr Tools
Table of contents
- Intro
- Marquee Tool
- Move Tool and Type Tool
- Lasso Tool, Paint Bucket Tool, and Eraser
- Magic Wand Tool
- Pencil and Brush Tool
- Clone Stamp Tool
- Drawing Tool
- Gradient Tool
- Blur and Sharpen Tool
- Smudge Tool
- Sponge Tool
- Dodge Tool
- Burn Tool
- Red-eye Tool
- Bloat Tool
- The Pinch Tool
- The Color Picker Tool
- The Hand Tool
- Crop, Color Replace, Spot Heal, and Zoom Tool
Intro
Make sure you know what each of the above icons stands for, along with a general idea of what each tool does. The following screencasts demonstrate each tool. To go study the names of the tools, open up Pixlr and hover your mouse over each tool. The name of the tool will appear.
Marquee Tool
In the following screencast, the Marquee tool is demonstrated making selections to your image.The screenshot below shows you where the marquee tool is located on the pixlr toolbar. The options for adjusting this tool are also labeled.
Move Tool and Type Tool
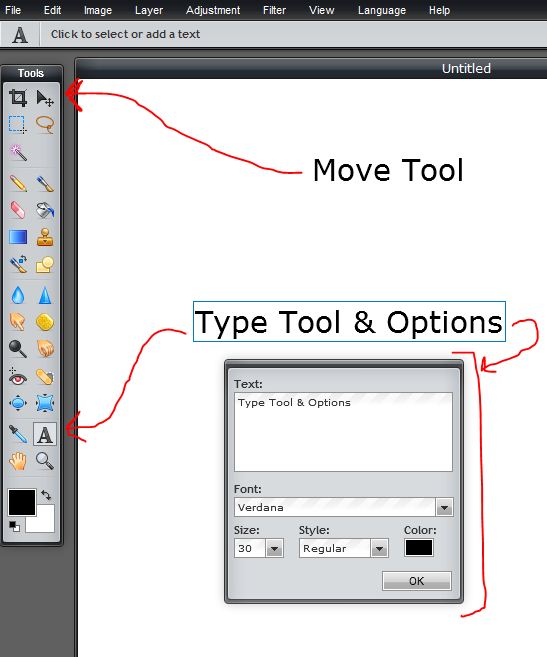
The following screencast demonstrates how to use the Move tool to move things around your canvas, and how to use the Type tool to add text to your canvas.The screenshot below shows you where the move and type tools are located on the pixlr toolbar. The options for adjusting the type tool are also labeled.

Lasso Tool, Paint Bucket Tool, and Eraser
The following screencast demonstrates how to use the Lasso tool to select things, Paint Bucket tool to fill in color, and Eraser to get rid of parts of your image.The screenshot below shows you where the lasso tool, paint bucket tool, and eraser tool are located on the pixlr toolbar.
Magic Wand Tool
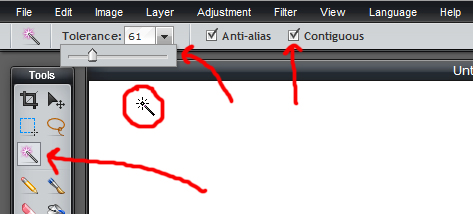
Watch the following clip about how to use the Magic Wand tool. Pay special attention to what "tolerance" and "contiguous" mean - you will need to know what those are. The tutorial below is done in Photoshop, but the magic wand concepts are the same in Pixlr. When the guy starts talking about rendering some clouds into the image at about minute 3, you can turn it off.This is what the magic wand settings look like in Pixlr:

Notice where you can set the tolerance, and the contiguous setting. You can also hold down "SHIFT" to add to your current selection.
Watch the screencast below that demonstrates how to use the magic wand in Pixlr:
Pencil and Brush Tool
Watch the screencast below as it demonstrates how to draw on your image using the Pencil tool and the Brush tool.The screenshot below shows you where the pencil and brush tools are located on the pixlr toolbar.
Clone Stamp Tool
The screencast below demonstrates how to paint on clones using the Clone stamp tool.The screenshot below shows you where the clone stamp tool is located on the pixlr toolbar. The options for adjusting this tool are also labeled.
Drawing Tool
The following screencast will demonstrate the Drawing tool making different shapes on an image.The screenshot below shows you where the drawing tool is located on the pixlr toolbar. The options for adjusting this tool are also labeled.
Gradient Tool
The screencast below will demonstrate how to use the Gradient tool to create gradients.The screenshot below shows you where the gradient tool is located on the pixlr toolbar. The options for adjusting this tool are also labeled.
Blur and Sharpen Tool
The screencast demonstrates how to use the Blur tool and the Sharpen tool to blur and sharpen different parts of your image.The screenshot below shows you where the blur and sharpen tools are located on the pixlr toolbar. The options for adjusting these tools are also labeled.
Smudge Tool
The screencast below demonstrates how to use the Smudge tool to smudge through different parts of your image, like sliding your finger through wet paint.The screenshot below shows you where the smudge tool is located on the pixlr toolbar. The options for adjusting this tool are also labeled.
Sponge Tool
The screencast below demonstrates how to enhance colors using the Sponge tool.The screenshot below shows you where the sponge tool is located on the pixlr toolbar. The options for adjusting this tool are also labeled.
Dodge Tool
The screencast below demonstrates the Dodge tool lightening up certain areas.The screenshot below shows you where the dodge tool is located on the pixlr toolbar. The options for adjusting this tool are also labeled.
Burn Tool
The following screencast demonstrates the Burn tool darkening certain areas.The screenshot below shows you where the burn tool is located on the pixlr toolbar. The options for adjusting this tool are also labeled.
Red-eye Tool
The screencast below demonstrates how to use the Red-eye tool to get rid of the possible red eye on your subjects' eyes.The screenshot below shows you where the red eye tool is located on the pixlr toolbar. The options for adjusting this tool are also labeled.
Bloat Tool
The screencast below demonstrates the Bloat tool making a certain area of your image grow bigger.The screenshot below shows you where the bloat tool is located on the pixlr toolbar. The options for adjusting this tool are also labeled.
The Pinch Tool
The screencast below demonstrates the Pinch tool decreasing the size of a certain area of your image.The screenshot below shows you where the pinch tool is located on the pixlr toolbar. The options for adjusting this tool are also labeled.
The Color Picker Tool
The screencast below demonstrates the Color-picker tool grabbing the exact same color as one of the colors that is already on your image.The screenshot below shows you where the color-picker tool is located on the pixlr toolbar.
The Hand Tool
The following screencast demonstrates the Hand tool dragging your image around. The shortcut key for the hand tool is the spacebar.The screenshot below shows you where the hand tool is located on the pixlr toolbar.
Crop, Color Replace, Spot Heal, and Zoom Tool
Watch the following screencast that demonstrates the following tools:- Crop - crops the image easily
- Color Replace - replaces a color that you select in your image
- Spot Heal - takes out speckles and spots
- Zoom - zooms in on the image
The screenshot below shows you where the crop, color replace, spot heal, and zoom tools are located on the pixlr toolbar.