Note for teachers: Your students will not have the same upload rights you as a teacher have in this Moodle course. If you're new to Moodle, I'd suggest creating a student account and looking at each of the activities while logged in as a student so you'll have a good idea of what they can and can't do.
Students: In this course you will post photographs in your assignments and discussions. There are several ways to do this using both built-in Moodle features and web-based photo hosting sites. Some photo hosting services are blocked by school firewalls. If you can't get the site you're using unblocked, try some of the other methods. We're not showing you how to cheat, just how to host your photos in a way your school permits.
Sharing photos using Moodle
Posting photos in the forum - You can attach one file to any post made in a forum. This is a great way to turn in Gallery Day assignments and to post reflections on single photos. In the forums, everyone in your class can see the photograph and can reply. When you want feedback on your photos, use the forum.
Posting photos in the blog - You can attach one file to any blog post. You have control over who sees your photo. You can share your work with the class or just with your teacher. When you want to keep your work private, use the blog.
Sharing photos using photo hosting sites
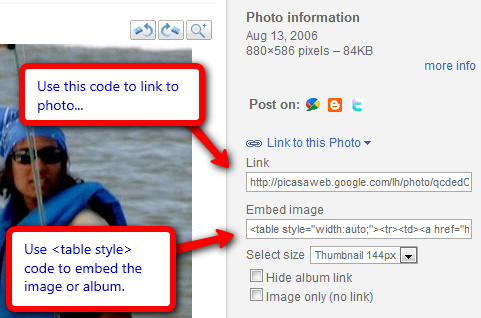
- Open a Picasa Web Album account. This is a great way to manage your photos. You can edit and upload images from the Picasa image application and post both individual images and slide shows to blogs and forums. NOTE: Posting slide shows in forums and blogs only works if your Moodle administrator has allowed the use of embed codes in posts.]
You'll need a Google Gmail.com account to have a Picasa web album. NOTE: A Gmail account is different than a Google Domain account. If you're using Google email and/or Google Docs at your school you'll need your own Gmail account to use Picasa Web Albums as they are not part of Google Apps. If you're in the U.S., you'll also need to be 13 or older.

- If you ARE using Google Apps in your school, there are several ways to share your photos. One way is to simply upload your photo to a Google Docs folder and the turn on sharing for the photo. Use the sharing link to post in your assignment or discussion. Another great way is to create a Google Site to hold your photos and post the link to your site. If you want to post photographs and reflections, consider creating a Google Presentation and then posting a link to it.
- Create a PowerPoint document and share it via Slideshare.net. The embed code than then be added to any blog or forum. Note: Google Presentation embed codes don't work with Moodle because they use the <iframe> format.
- There are lots of photo sharing sites but the largest may be Flickr.com. Flickr lets you link to individual photos and provides ways of sharing slide shows with groups of photos. Other sites you may want to try are PhotoBucket.com, Smilebox.com, Shutterfly.com. Slide shows from many of these sites can be embedded in Moodle blogs and forums.
- One last suggestion for photo sharing is PhotoShop.com. This site is powered by Adobe and it includes photo editing, publishing and sharing.
- A good way for your teacher to create a photo sharing site just for your class is to use NING.com. The NING-mini version is free to schools and has all the photo hosting options you'll need. If NING.com is blocked by your school, they can open up access to just your school photo NING and leave the rest of the NING site closed. I've created a sample NING you can see at photok12.ning.com.
Find more photos like this on photok12