Jump to: Moodle Zen | VIP - Activities that will require editing | Why e-Portfolios | Future Builds
Welcome Educators!
Thank you for visiting my course - Creating Student e-Portfolios using Google Sites! If you have decided to download and use this course, I would encourage you to review ALL the information in this resource as there are some tips and hints on how to make this course successful for you and your students.
Moodle Zen
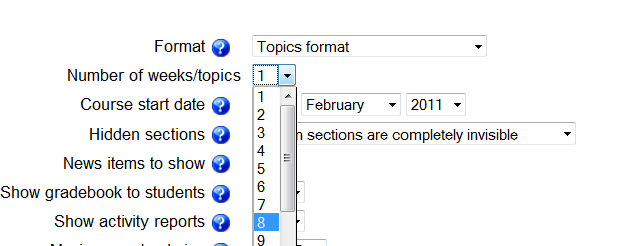
This course has been developed using the Compact Design technique, or what I prefer calling -- Moodle Zen. The main benefit of using this process is that it saves participants and instructors from suffering from the "Moodle Scroll of Death". It does take some getting use to, but I have also ensured that if any educator wants to use the traditional Moodle course, they could do that as well. When you download and install on your server, go into the Administration settings of this course. You will notice that the course only has 1 topic. Hiding the other topics still make resources/activities accessible without being seen. (This is a great benefit over closing the eyelid feature - as that makes items UNUSABLE to students even if you link to them)
If you want to view the course with all of the elements in the traditional way - Change the number of topics to 8. 
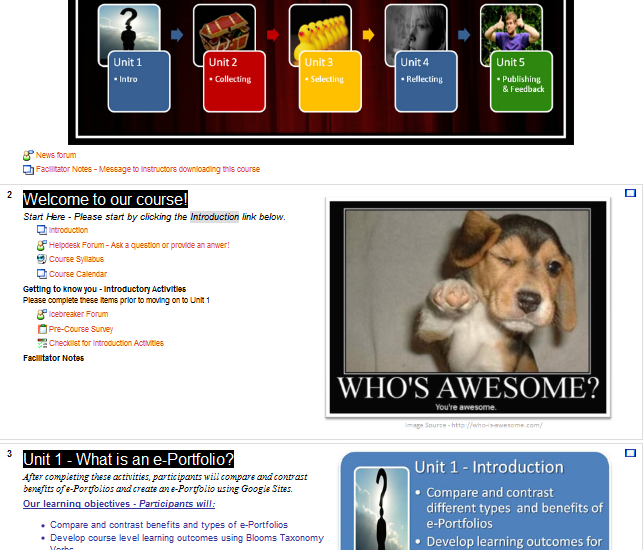
Click save and you will see a more traditional Moodle course. The screenshot below will give you a preview of what this course looks like.
Be very careful when creating new resources and using the compact design. You will note that almost all resources and activities have a custom navigation bar at the top of the page. If you want to add a new resource or activity would like to use with your students - it will require you to add a link to those resource on every page. Copy and pasting the headers does NOT work as Moodle adds some funky code to the header when pasted. Copy and pasting the HTML code of these headers does work. You will just need to remember you have to copy and paste the HTML code on every page that has that particular header. The easiest way to customize resources and activities in this course is to use the current placeholders and just UPDATE the moodle resources/activites with the information you want to add or change.
Mapped images. Some of the images within this course (Like the MAIN screen, and the Unit Bar at the bottom of each Unit Reading page) are mapped to hidden resources. The easiest way to do this is to use a WYSIWYG web editor like Dreamweaver. (There may be open source options as well) After setting my map hotspots, I then pasted the HTML source code into the Moodle page or label. An easier route is that I HIGHLY recommend that you CHANGE the content of those resources, versus deleting or adding brand new Moodle resources.
Many of the course images were created by using PowerPoint (2007). Knowing that you may want to change the objectives to suit your needs, I have included the PowerPoint used in this course. It is located in the FacilitatorNotes folder within the ROOT of this course.
VIP Activities that will require editing
I like Using Google docs in my courses. Because of that, some of the files will need to be copied so that you have edit access. You will also have to update some header navigation bars with new links. Below are the resources/activities that will need tweaking. If you are unfamiliar with Google Apps and how to share and change permissions, this may be an issue for you to use this course. (at least with the compact design)
Unit 1 -Pre-Course Survey
This is a Google Form. To make a copy and use it click on this spreadsheet and make a copy. It is EMBEDDED on the resource page, so if you follow the same process, (embed google form in Moodle activity/resource page) you will NOT have to relink the header.
Unit 5 - Peer Evaluation
This is a Google Form. To make a copy and use it click on this spreadsheet and make a copy. It is EMBEDDED on the resource page, so if you follow the same process, (embed google form in Moodle activity/resource page) you will NOT have to relink the header.
Unit 5 - Course Evaluation
This is just a link to a survey site called createsurvey.com. Zoomerang, SurveyMonkey are examples of others that can be used. I have come to appreciate the feedback I receive from participants as it helps me to improve my course. I then embedded the link in the page by using using iFrame HTML code.
Why ePortfolios?
My district migrated to Google Apps for Education in 2010. After a Senior e-Portfolio project using Google Sites, our English department decided Google Sites would be a great vehicle for students to begin developing/storing/showcasing their e-Portfolios starting in 9th Grade. After researching e-Portfolios, from experts like Dr. Helen Barrett and others, I quickly realized that training would need to be developed to effectively implement e-Portfolios in our school. I will officially be facilitating this course (for the first time) this summer (2011) with our staff.
Future Builds
My plans are to facilitate this course with lead teachers in the summer 2011, and then observe the implementation of using Google sites for student e-Portfolios within my district. I also plan on having a good dialog with my staff on how the course could have been improved to make implementation plan better. After these items are complete, I plan on making edits and re-submitting this course to the commons. (Hopefully by Winter 2012.)
Enjoy the course! And good luck implementing e-Portfolios in your classrooms or schools!
Sincerely,
Jen Hegna